README
by ACM at CSUF
The official ACM at CSUF blog. 
Setting up GitHub Desktop for ✨Game Development✨
What is GitHub Desktop?
Before the command-line Git warriors come for me, I ask that you read this post in its entirety first...
GitHub Desktop is a beginner-friendly user interface for source control with Git. It's used by a lot of game developers to keep track of changes to their code. Game devs also use other GUI's such as GitKraken, BitBucket, QGit and more - but we'll cover those another time. GitHub Desktop functions like any other GUI and allows you to utilize a client to manage source code, deploy their code, keep track of branches, track issues and bugs, etc.Why GitHub Desktop?
I'm sure you're thinking "Steph, I already know how to use git in command line because they shoved the commands down our throats since CPSC 120". Well you're right for individual and small-scale group projects. You only use command-line for game development if you're a masochist.
Using a GUI for source control is a much better choice for a variety of reasons:- In game dev, you'll be working with non-programmers who will have no idea how to utilize Git in the command line. This allows for non technical roles like artists, composers, designers, and producers to upload and push their changes and assets.
- It provides an easy to understand and use interface for beginners who aren't accustomed to the command line interface yet. This reduces the learning curve and increases productivity!
- There are way too many files for game development to be streamlined simply on command line. Source control GUIs like GitHub Desktop allows you to compare views of files side by side. For example, you can view two versions of the same sprite character sheet asset side by side during a merge conflict to ensure that you're keeping the artist's most updated version. (Artists get very sad when you don't use their art 😔
Basically having everything at the click of a button instead of having to memorize a bunch of commands to start doing game development is a major plus!

Don't worry GitHub Desktop has a dark mode too!Setting up GitHub Desktop for Unity
1. Setting Up GitHub Desktop
Now we get to the juicy part! Head on over to the GitHub Desktop website and download the latest version (we'll be using Windows OS for this tutorial for sake of simplicity).
Go ahead and sign into your GitHub account. If you haven't made one and need help feel free to message in the ACM discord server or turn to your neighbor in class.
Now, click onFileat the top left of the GUI and selectOptions. We're going to be adjusting some settings to make it more ✨customized✨ for you!
Feel free to go through each tab and change each options to your preferences! Don't forget to click save at the end!
2. Creating a new Repository for Unity
Once you have all your settings in order, let's create our repo! Go ahead and clickFilein the top left corner again and selectNew repository.
Next, you're going to be greeted with a brand new menu for your new repo's settings. Fill out the settings as you would normally (feel free to copy the example below) but make note of theGit ignoresection!
⚠️ Important!
Make sure to set theGit ignoretoUnityfrom the dropdown menu. Make sure to selectUnityand NOT Unity Engine. The Unity community preset is more comprehensive, frequently updated. The Unity Engine preset is given by Unity themselves and may not include all the necessary .gitignore presets.
⚠️ Once you're finished with the presets, double check that everything is how you want it and selectCreate repository.
3. Admire your shiny new Unity game repo😩💦
Publish repository. You're going to be greeted with another settings menu once more. Feel free to use the dropdown menu and select anorganizationthis repository is affiliated with, but that's completely optional! You can also uncheckKeep this code privateif you're a based open source girly 💅
Congratulations!
You can now use the repository you have just created for source control for your own Unity game! If you have questions, feel free to contact Steph (Commodore Jellyfish#5175) on the ACM Discord 💜What's next for ACMForge?
Stay tuned for upcoming ACMForge updates!
We'll be learning how to set up a repository for Unreal, how to create a new Unity project, and how to create a new Unreal project. If you have any suggestions or more tutorials you'd like to see, feel free to let us know!
- Steph 💜Git Good #1: Rewriting History
Welcome to part 1 out of ??? of my git series (super original title I know) covering slightly intermediate to advanced topics that you may or may not have been familiar with. I figured what better way to start this series than by covering some of what are possibly the most dangerous commands in git and when you might want to use them. This blog post will cover 2 methods to rewrite history.
WARNING: you almost NEVER want to rewrite history as it tends to end up being a great way to either shoot yourself in the foot, shoot someone else in the foot, or blow off the legs of everybody involved. If this is your own repository and you are the only contributor, then by all means, go off. If this is someone else’s repository then you should reconsider or instead consider using a git revert instead as it amends rather than rewrites history. However, if your intent is to erase commits from the commit log entirely then this guide is for you.
Scenario 1: You want to rewind to a specific commit, nuking all newer commits

What’s this? You accidentally directly pushed to the acmcsuf.com main branch and are now panicking because Karni might beat your ass the next time she sees you? Well there’s no need to fear because this is where dangerous git command # 1 comes into play.git reset --hard-
Head over to Github and copy the SHA of the commit you want to rewind to
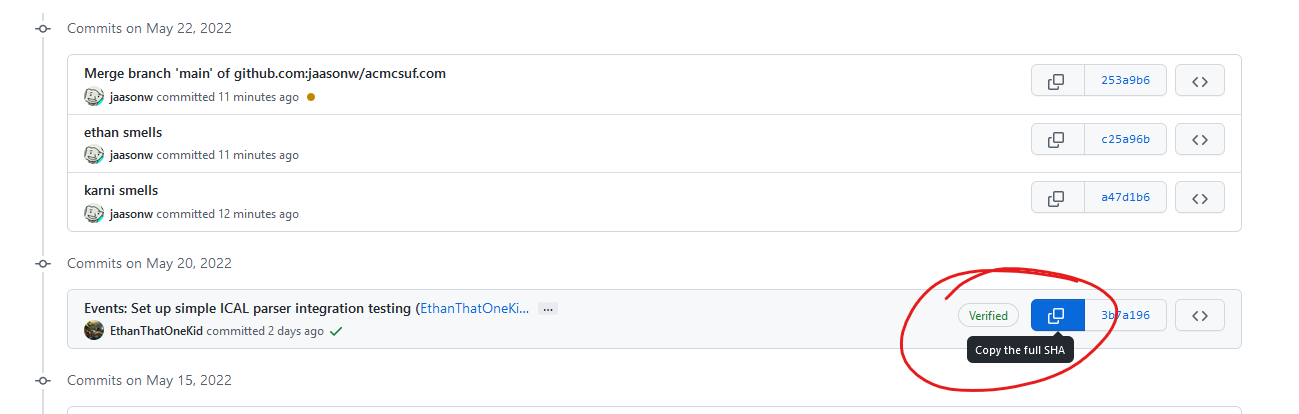
-
Head over to your terminal and run
git reset --hard [SHA]. This will rewind your local copy of the repository to the commit you want, discarding ALL modified changes. If you’d still like to keep the changes without committing them, just exclude the --hard

-
If you tried to git push now, your changes would be rejected as they would rewrite history in the upstream copy

-
To remedy this, simply run dangerous git command # 2: git push --force which should be pretty self explanatory in what it does, which is to force git to accept your changes whether it likes it or not

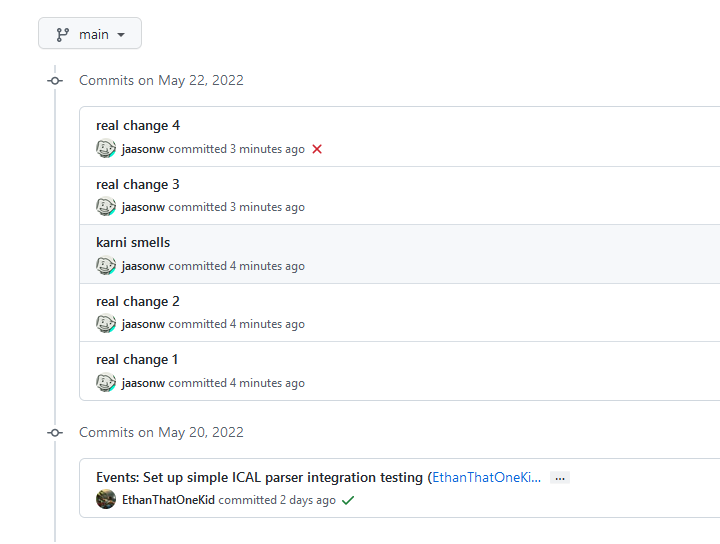
As you can see, our commits are now gone and your ass is now saved from Karni
Scenario 2: You want to remove a specific commit or multiple commits but keep the rest
Uh oh, you committed the wrong commit to the wrong branch and then committed more commits on top of that commit, Karni’s really gonna beat your ass now. Don’t worry, once again I got you covered with dangerous git command # 3git rebase --interactive(or just git rebase -i)Admittedly this command tends to be less dangerous, less easy to mess up, and actually legitimately useful for doing things like splitting a pull request with 3 features into 3 separate branches. Rebasing could honestly be a whole blog post on its own but I’ll be covering just 1 specific use case here
-
Just like above, pick the commit you want to go back to and start picking from
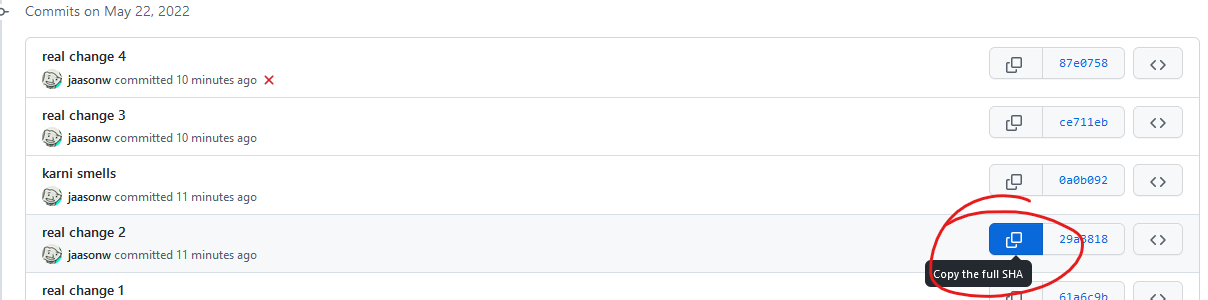
-
Head back over to your terminal and run
git rebase -i [SHA], this will open a text editor, either nano or vim (personally I don’t know how to use vim so if you get vim then just press i to put it in notepad mode and use it like notepad)

-
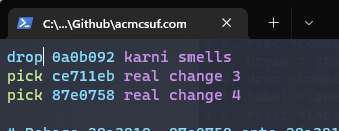
From here, you’ll see a list of commits past the commit you selected earlier, to remove a commit, either delete the line or replace pick with drop
-
If you’re using vim it’s escape -> :wq to save and quit, if you’re using nano it’s ctrl + x
-
From here you may or may not have to resolve any rebase conflicts which are just like merge conflicts so go ahead and get those resolved if applicable
-
Once again, this rewrites history so you’ll have to use git push --force again and the commit in question should now be erased and your ass is once again saved from a beating

Thanks for reading and once again please use caution when using these as they are as dangerous as they are powerful and you can easily lose your own or someone else's commits in the process or create a merge conflict problem for someone else when they suddenly can't push to main. Best advice I can give to minimizing this kind of damage is to only use these commands on branches/forks that only you work on and to never do this on main.
Edit 6/8/2022: Make use of newly added code block support
May 23, 2022 • 5 min read-